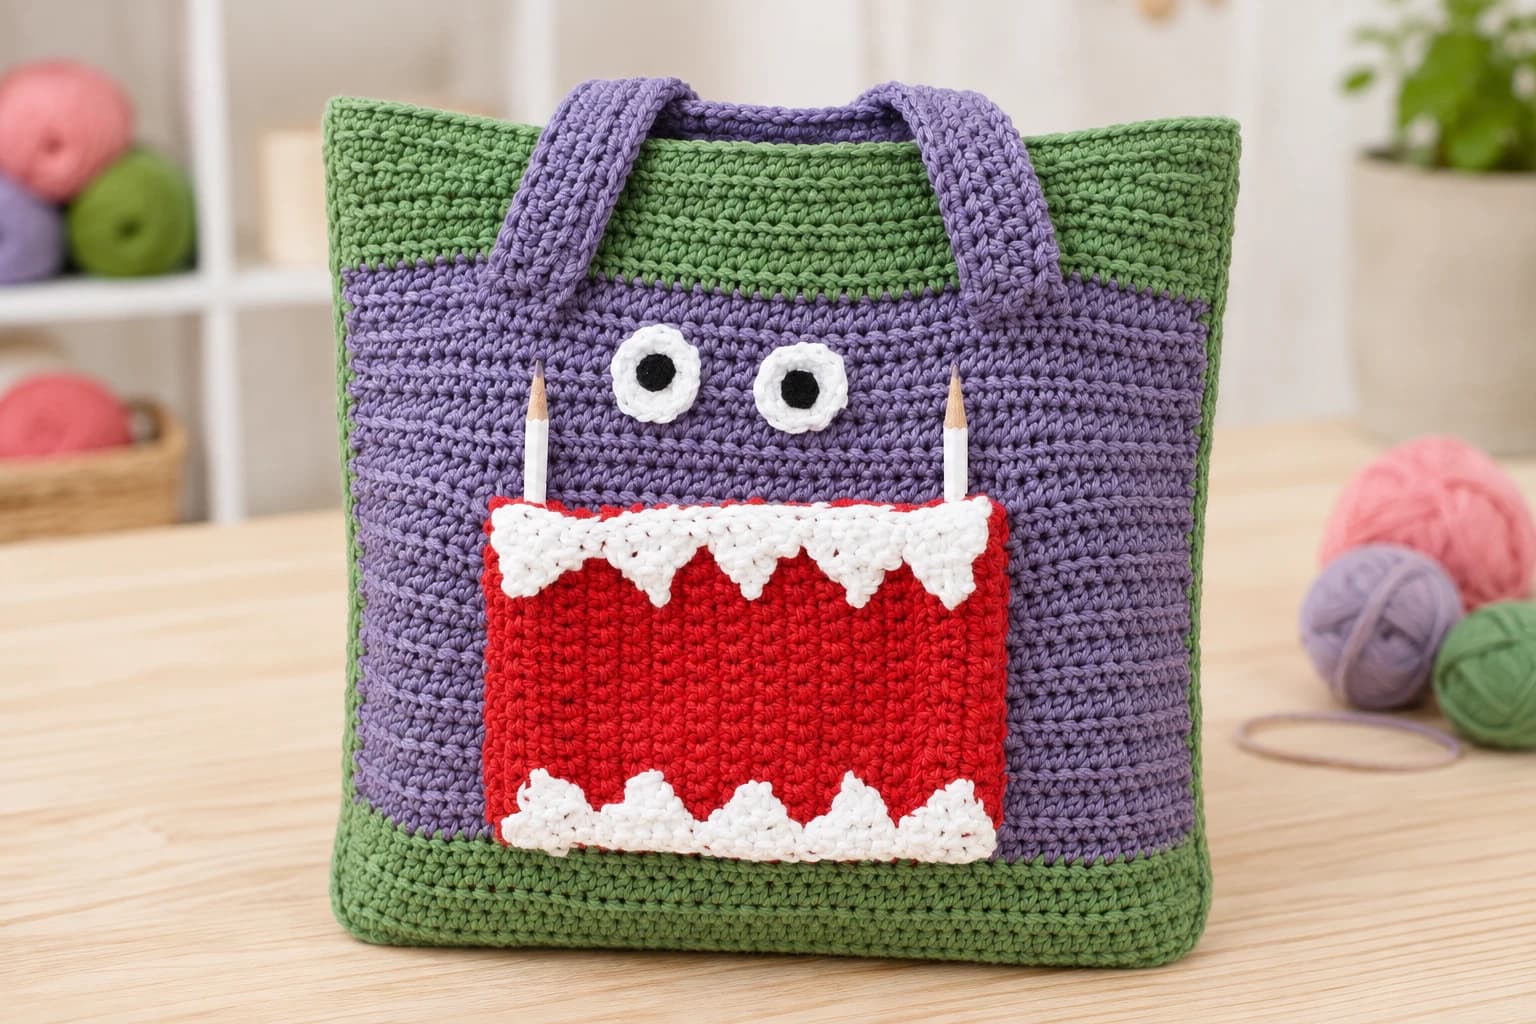
The Snack Monster crochet tote bag has a useful detail hidden in its red mouth: a pocket for small supplies, with a narrow pencil slot on each side. Two white tooth strips frame the pocket, and a pair of small crochet eyes completes the face. The green-and-violet bag itself is made from two flat pieces, so you can finish and measure each panel before joining them.
This guide is based on Yarnspirations' Red Heart Snack Monster Crochet Tote, pattern RHC0303-040264M, dated August 28, 2026. The original design and the stitch charts reproduced below are credited to Yarnspirations. CraftsChain has reorganized the written directions, added practical checkpoints and created a new editorial project image. These instructions have been checked against the supplied PDF, not independently crochet-tested by CraftsChain.
Abbreviations and Pattern Notes
| Term | Meaning |
|---|---|
| ch | Chain |
| hdc | Half double crochet |
| sc | Single crochet |
| sc2tog | Single crochet two stitches together |
| sl st | Slip stitch |
| st / sts | Stitch / stitches |
| RS / WS | Right side / wrong side |
| rem | Remaining |
| rep | Repeat |
| yoh | Yarn over hook |
For sc2tog, insert the hook into the next stitch and draw up a loop, then do the same in the following stitch. Yarn over and draw through all three loops. Each decrease turns two stitches into one.
The turning ch 2 does not count as an hdc. Keep 45 hdc across each bag panel and 67 hdc across each handle row. Work in both loops unless a row specifically calls for front loops or back loops. The pocket's loop-only rows create folds and attachment points; they are structural, not optional texture changes.
Pattern Instructions: Two Bag Panels
Make two matching pieces using A and B.
- With A, chain 47.
- Row 1: Work 1 hdc in the third chain from the hook, then 1 hdc in each remaining chain. Turn. You have 45 hdc.
- Row 2: Ch 2, then work 1 hdc in each of the 45 stitches. Turn.
- Repeat Row 2 in A until the panel measures 2 in / 5 cm from the foundation edge. Join B.
- Continue the same row in B until the total panel height is 10 in / 25.5 cm from the foundation edge. Join A.
- Continue in A until the total height is 12 in / 30.5 cm. Fasten off.
The 10-inch measurement is cumulative. It does not mean adding another 10 inches of violet above the first green section. Lay both panels together before moving on: their width, height and color boundaries should align.
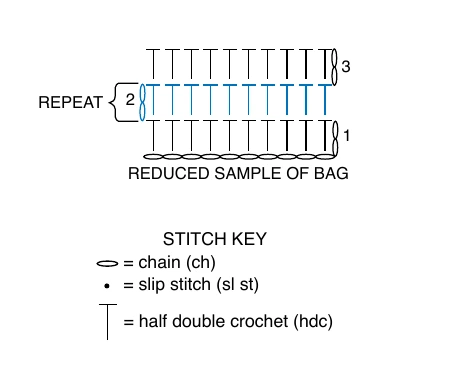
The chart above is a visual companion to the written panel directions. The oval symbols are chains, the dots are slip stitches and the tall T symbols are half double crochet. Repeat the second chart row until you reach each stated measurement.
Mouth Pocket and Pencil Slots
The mouth begins as a red strip with 17 sc across. Folded sections at its two ends become the pencil slots when the pocket is positioned on the bag.
First pencil slot
- With C, chain 18.
- Row 1 (RS): Sc in the second chain from the hook and in every remaining chain. Turn. 17 sc.
- Rows 2–4: Ch 1, sc in each stitch across, and turn.
- Row 5, folding row: Ch 1; work 17 sc in back loops only. Turn.
- Rows 6–8: Ch 1; work 17 sc in both loops. Turn after each row. Place a marker at the end of Row 8.
- Row 9: Ch 1 and fold the work at Row 5. Crochet through both layers, pairing each stitch with a remaining loop of the foundation chain. Work 17 sc across and turn. This closes the length of the first pencil sleeve while leaving its ends open.
Central pocket section
Row 10: Ch 1, work 17 sc across, and turn. Repeat this row until the work measures 5½ in / 14 cm from the marked row, ending with a WS row.
Keep the first marker in place while measuring. The measurement is taken from that marked row, not from the original foundation edge.
Second pencil slot
- On the next RS row, ch 1 and work 17 sc in front loops only. Turn and mark the end of this row.
- Work three rows of ch 1 and 17 sc in both loops, turning each time.
- On the next RS folding row, ch 1 and work 17 sc in back loops only. Turn.
- Work another three rows of ch 1 and 17 sc. Fasten off after the last row.
- Fold at the last back-loop folding row. Sew the final edge to the remaining loops of the marked front-loop row. This forms the second pencil sleeve.
Before adding teeth, check that both narrow sleeves remain open. The larger pocket opening will be the top edge between them when the piece is sewn to the bag.
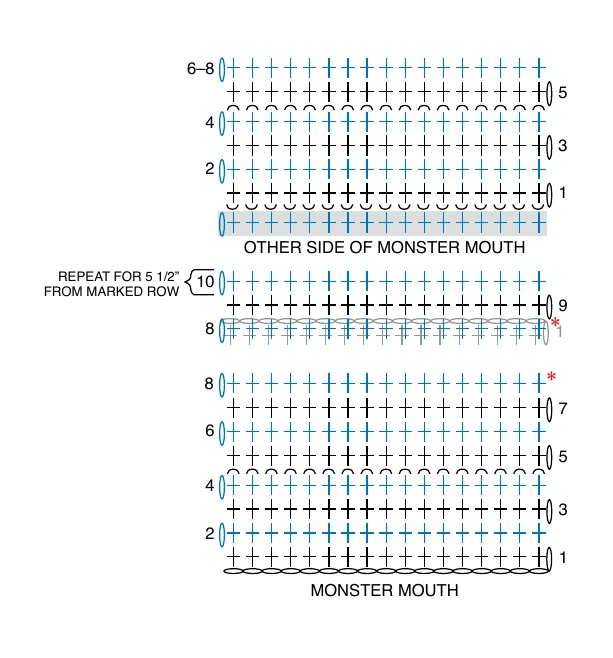
The mouth chart separates the central pocket from the folded section on the opposite side. Use the row numbers, marked rows and the written instructions together; the 5½ in / 14 cm section is measured rather than assigned an invented row count.
Two Strips of Teeth
Make two white strips, each with five teeth. One strip frames the top of the mouth and the other frames the bottom.
With D, chain 26. Sc in the second chain from the hook and in every remaining chain, then turn: 25 sc.
Shape the first tooth
- Tooth Row 1: Ch 1, sc2tog, sc in the next stitch, sc2tog. Turn, leaving the remaining foundation-row stitches unworked. This uses five stitches and leaves three stitches.
- Tooth Row 2: Ch 1, sc in the first stitch, sc2tog. Turn. Two stitches remain.
- Tooth Row 3: Ch 1, sc2tog. Fasten off. One stitch forms the point.
Repeat for the other four teeth
Join D with a slip stitch in the next unworked stitch of the 25-sc foundation row. Repeat the three tooth rows over the next five stitches. Continue until all five teeth are complete. Work the second strip in the same way.
Sew the strips to the red pocket, with the points facing toward the center of the mouth. Do not stitch the pencil sleeves closed. The five groups use all 25 foundation stitches: 5 teeth × 5 stitches per tooth.
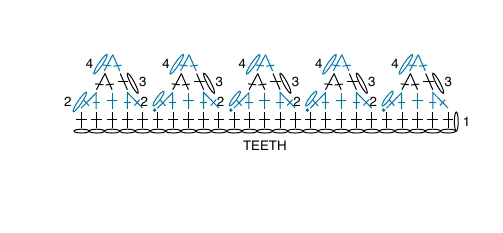
Each five-stitch group in the chart narrows from five stitches to three, then two, then one. Fasten off at the point and rejoin the yarn at the next unworked foundation stitch.
Crochet Eyes
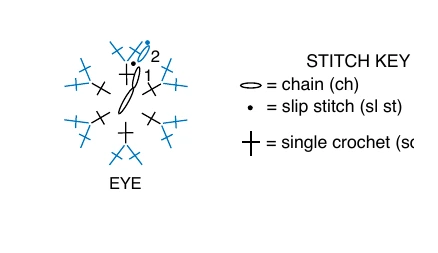
Make two matching white circles for the face shown in the source photograph.
- With D, ch 2.
- Round 1: Work 6 sc in the second chain from the hook. Join to the first sc with a sl st.
- Round 2: Ch 1 and work 2 sc in each stitch around. Join to the first sc with a sl st. 12 sc.
- Fasten off.
Cut two small black felt circles for the pupils. The source gives their approximate diameter as ½ in [1.5 cm]; these are rounded equivalents, so use that as an approximate visual size. Glue one to the center of each eye, then sew the white circles to the front panel above the mouth.
Handles
Make two handles in B.
- Ch 69.
- Row 1: Hdc in the third chain from the hook and in each remaining chain. Turn. 67 hdc.
- Row 2: Ch 2, hdc in each stitch across, and turn.
- Repeat Row 2 four more times. There are six hdc rows in total, including Row 1.
- Fold the strip in half lengthwise. Work sc through both layers, matching the stitches on the last row with the remaining foundation-chain loops. Fasten off.
Match the two handles before attaching them. The fold is along the long dimension; folding the strip end to end would produce the wrong shape.
Assembly and Finishing
Join the body
Place the bag panels with their wrong sides together. Join A with a sl st at the top-left corner. Ch 1 and sc evenly through both layers down one side, across the bottom and up the other side. Work 3 sc in each bottom corner. Leave the top open and fasten off.
The source calls for an even edging but does not specify a total seam stitch count. Space the stitches so the edges join smoothly without puckering or flaring.
Attach the face and handles
Position the mouth on the front as shown in the source photograph. Sew it down while leaving its top edge open and keeping both pencil slots usable. Sew the eyes above it. Attach one handle to each side of the bag, following the photograph for placement, and check that neither handle is twisted.
No exact eye spacing or handle attachment distance is given in the PDF. Pin the pieces in place first and compare their alignment before sewing permanently. Finish by securing the yarn ends and checking each attachment.
If the tote will be used by a child, check the glued felt pupils and every sewn attachment before use. Repair loose pieces immediately and supervise use where small detached parts could be a hazard.
Troubleshooting and Final Checks
- Panel becoming narrower: Count 45 actual hdc stitches. The turning ch 2 is not an extra stitch.
- Color bands do not match: Compare the cumulative 2-, 10- and 12-inch heights on both panels.
- Mouth pocket will not fold correctly: Check the back-loop Row 5, the Row 8 marker and the later marked front-loop row before unpicking the whole pocket.
- A tooth strip runs out of stitches early: Each tooth must start over five unworked foundation stitches. Do not work a sixth foundation stitch into the previous tooth.
- Pencil slot or pocket is closed: Check the sewing path. Teeth should attach without catching both sides of a sleeve, and the large pocket needs an open top.
- Handles have different widths: Each has six hdc rows before folding, not four rows in total.
For cleaning, follow the instructions for the yarn and glue you actually used. The source does not provide a finished-bag washing method or a tested load limit, so do not assume the felt, glue and crochet can all be treated like plain yarn fabric.
Frequently Asked Questions
Is this an easy crochet pattern?
The source rates it Easy. You need half double crochet for the body and handles, single crochet for the mouth and eyes, decreases for the teeth, and some folding and sewing. The mouth construction deserves a careful read even if the stitches are familiar.
Is the body worked in the round?
No. Make two flat panels in rows, then crochet them together along the sides and bottom. Only the small white eye circles are worked in joined rounds.
How many teeth does the bag have?
Ten in total: five on the top strip and five on the bottom strip.
Can I change the colors?
You can choose a different palette while keeping A, B, C and D assigned consistently. Keep the yarn requirements and gauge in view; different shades or brands may come in different ball sizes.
Does this guide include lining or a closure?
No. A fabric lining, magnetic snap, horns and plastic safety eyes are not part of this source pattern. The bag has an open top, crocheted handles, a red mouth pocket and white eyes with felt pupils.
Where can I find another crochet bag project?
Browse our crochet bag patterns, or try the chunky granny tote guide for a different construction based on two oversized motifs.